13. Medial Axis Exercise
Medial Axis Skeletonization

The medial axis method is an image processing technique for identifying a "skeleton" of a binary image, or in this case, your grid map of obstacles and free space. In this exercise, you'll be using the medial_axis() transform method within the the Scikit-Image library.
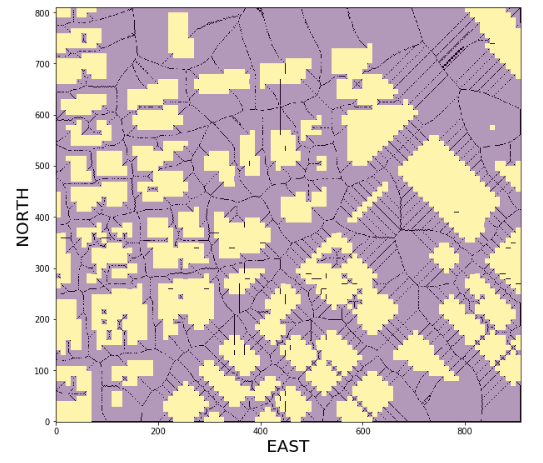
This method returns the one-pixel-wide skeleton of the image so for instance, when you run it on the grid you've created of the environment from the previous exercises, it looks like this:
from skimage.morphology import medial_axis
from skimage.util import invert

# Assuming you've already created the grid
# The medial_axis() method requires that we invert the grid image
skeleton = medial_axis(invert(grid))
plt.imshow(grid, origin='lower')
plt.imshow(skeleton, origin='lower', alpha=0.7)
plt.show()
Now the black pixels represent the medial axis of the free space and now the entire connectivity of your free space is expressed as strings of adjacent pixels laid out along these medial axes between obstacles. So how can you use this for planning?
Medial Axis Exercise
In this exercise, you'll extract a grid map of obstacles and free space as in previous exercises and run the medial axis transform on it to get at the underlying skeleton of the free space. There are a variety of options for how you could use this output for planning, but the way you'll do it in this exercise is to simply identify the points on the skeleton that are closest to your start and goal locations, then run A* across the skeleton to find a path between these points.
Next, you can use collinearity or Bresenham (or maybe some other method) to reduce the path you found through the skeleton to a sparse collection of waypoints! If you get stuck you can have a look at our solution by scrolling down to the link at the bottom of the notebook.
Workspace
This section contains either a workspace (it can be a Jupyter Notebook workspace or an online code editor work space, etc.) and it cannot be automatically downloaded to be generated here. Please access the classroom with your account and manually download the workspace to your local machine. Note that for some courses, Udacity upload the workspace files onto https://github.com/udacity, so you may be able to download them there.
Workspace Information:
- Default file path:
- Workspace type: jupyter
- Opened files (when workspace is loaded): n/a